

Microsoft Word documents are incredibly flexible. You can add all kinds of formating so that you can present and layout your documents in the best way to get your message across. We share some tips here
Selecting text in Microsoft Word
Selecting text in Microsoft Word is something you do nearly every time you use this software. It lets you change the text size, font or formatting. And it’s essential if you ever want to copy and paste text.
You almost certainly already know the easiest way to select text in Microsoft Word:
- To select any block of text: click and hold the mouse button at the start of the text you want to select, drag the cursor to the end of your chosen section, then release the mouse button.
However, if you're trying to select a large block of text, this approach can sometimes result in the page scrolling past rapidly, while you struggle to reverse things.
To avoid this problem, try these methods instead:
- To select individual characters: insert your cursor in front of the first character, press the shift key and then use your left or right keys.
- To select one word: move the mouse pointer over that word and double-click with the left mouse button.
- To select a whole paragraph: hold the mouse pointer over a word in the paragraph and triple-click with the left mouse button.
- To select the whole document: hold down the Ctrl key on your keyboard and tap A.
- To select a line or row of text: hold the mouse pointer in the left-hand margin so you see the normal arrow, but pointing towards the top right. Then left click.
- To copy text: hold down the Ctrl key on your keyboard once you have selected your text and tap C.
- To paste text: hold down the Ctrl key on your keyboard once you have copied your text and tap V.
- To cut text: hold down the Ctrl key on your keyboard once you have selected your text and tap X.
In older versions of Microsoft Word you'll also see four other items: REC, TRK, EXT, and OVR - hover your mouse over each to see what it means.
 To select any block of text: double-click on EXT so the letters turn black. Click at the start of your chosen section of text, then move to the end and click again. Job done. (If you change your mind, just click again.)
In newer versions of Word the same can be achieved by pressing the F8 key and then using the up and down arrows on your keyboard to select the text you require.
Other handy tips when using Word
Copying formating
The little-known but supremely-useful Format Painter tool in Word lets you select some text, then copy how that text is formatted across to another chunk of text.
It's a big timesaver when you're trying to work with text you've copied and pasted from different sources, or you're trying to get a messy document into some semblance or order.
How to copy text formatting
Here's how to copy formatting from one block of text to another:
1. Select the text that's formatted the way you want by clicking and dragging with the mouse
2. Click the Format Painter on the Microsoft Word ribbon. It'll look something like this:
![]()
(It might also be labelled Format Painter.)
3. Find the text you want to format in the same way.
4. Highlight that text by clicking and dragging with the mouse
5. When you release the mouse button, the formatting of the text will change.
You should find that all formatting transfers, like text font, effects, size, colours, shading and spacing.
Adding headers and footers
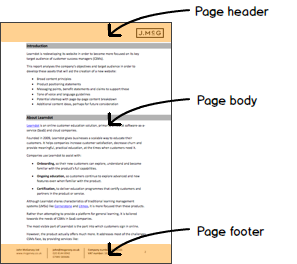
Headers and footers are standard items that you can insert at the top and bottom of pages in Microsoft Word.
Unsurprisingly, the header is at the top of the page and the footer at the bottom. Headers and footers often contain page numbers, a company logo or a small amount of text.
Microsoft Word includes an option for headers and footers. This allows you to create a header or footer once, then add it to every page of your document.
How to create a footer
Here's how to create a footer in Microsoft Word. The process for creating a header is exactly the same, except you should edit the area at the top of the page rather than the area at the bottom.
(These instructions apply to recent versions of Microsoft Word.)
- To edit the footer in your document, scroll to the bottom and then double-click just above the end of the page. This should open the footer.
- You can now edit the footer just like any other part of your document. First, we'll add a page number.
- To add page numbers, position your cursor where you want to add the number. (Page numbers will appear automatically on each page.)
- On the insert tab, choose Quick Parts and then Field.
- Select Page, then choose OK. You should see a page number appear in the footer. You can use the usual Word tools to change the font, size and alignment.
- To add a logo, select the Insert tab, then choose Pictures.
- Now locate an image of your logo on your computer. Double-click it.
- The logo will be inserted into the footer. You can resize and move it just as with any other image in Word.
- Once you're happy with the positioning of your logo and page number, double-click outside of the footer area to move back into your document's body.
- The footer you've created will automatically appear on every page. If you want to change it, just double-click back inside that area.
Headers and footers are explained in this video by Webucator.
Adding page numbers
Adding page numbers to a Microsoft Word document sounds like it should be a simple task. But if you don't know how to do it, it's hard to work out how.
We've seen people adding numbers to pages individually or even writing them on after they've printed their document out. So, today we explain how to add automatic page numbers to a Microsoft Word document:
- Make sure the document is open in Microsoft Word.
- Go to the Insert menu and choose Page Number
- A dropdown will open allowing you to select where to insert your page numbers. For this example, select Bottom of Page.
- You can then choose from a range of styles. We'll choose Plain Number 1, but you can select a different one if you prefer:

- Now you'll see that page numbers have been added to your document. They'll appear automatically on every page.
- You can change the font and formatting if you like. Just highlight the number and then choose your formatting options (font, size, etc) as with any other text.
- Once you're done with your page numbers, double-click outside the footer to edit the main part of your document again.
If you need to make further changes to your page numbers, just double-click any page number in the document.
There are lots of other things you can do with headers and footers, and there's plenty of information about working with them available on the Microsoft website.


